
Mac Pro and PowerMac Delta Fan Pinouts and PWM Wiring
I’m going to make an air scrubber to filter ABS fumes (mostly styrene) with a couple fans from my stack of retired Mac Pros. They are are wonderful static pressure Delta brand fans. I couldn’t find a clear pinout for a few common Mac fan connectors, and I noticed a lot of people wiring them up to straight DC sources wondering why they didn’t work. I’d like to help make things clear.
Motherboard/Molex Conversion
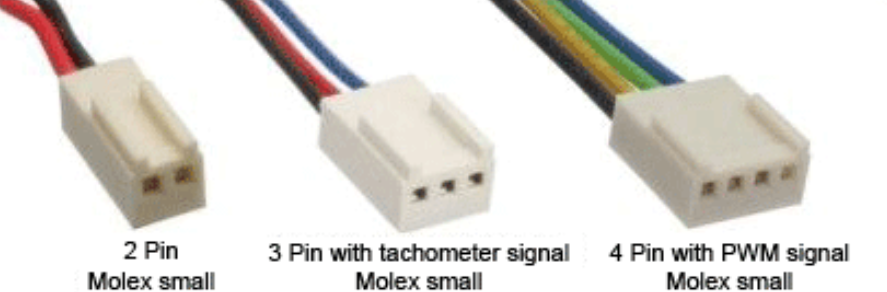
If you’re reusing these with your hackintosh or case mod build, you’re going to want to repin these fans to work with your motherboard. You’ll have to acquire the connectors and pins which work with your motherboard. Chances are the connector you need to use looks like one of the Molex 2, 3, or 4 pin connectors. I’m not covering this in depth since I’m using these for a 3D printer project, but contact me if you’d like to have me break this down further.
The 4 wire Mac fans that I’ve used have all been PWM. The +12 is a constant and the pulse train frequency controls the speed.
If the fan has more than 3 wires it is almost invariably going to be PWM type. +12, GND, PWM, and Sense/Tachometer. The 4 wire Mac fans are about the same Delta brand fans as you’d see in a PC except the pin configuration is usually different. You can obtain those connectors and pins from Amazon and eBay pretty easy for a clean looking conversion.
Wikipedia: Computer Fan #Connectors, Female Housing: 47054-1000, Female Contacts: 08-50-0114, Male Header: 47053-1000
Pinouts
Motor Connections
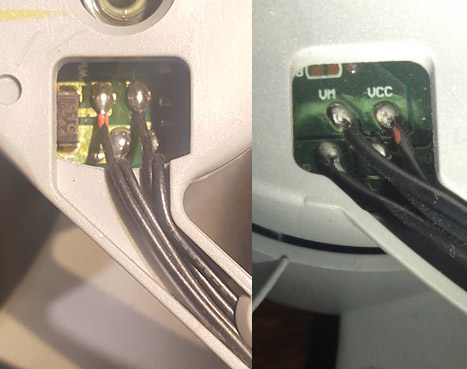
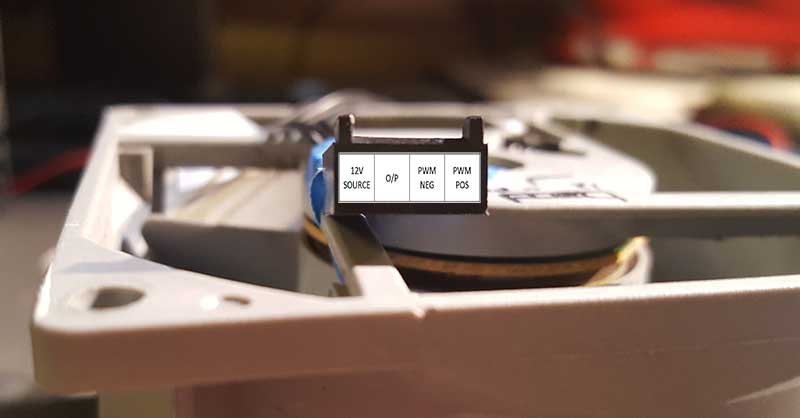
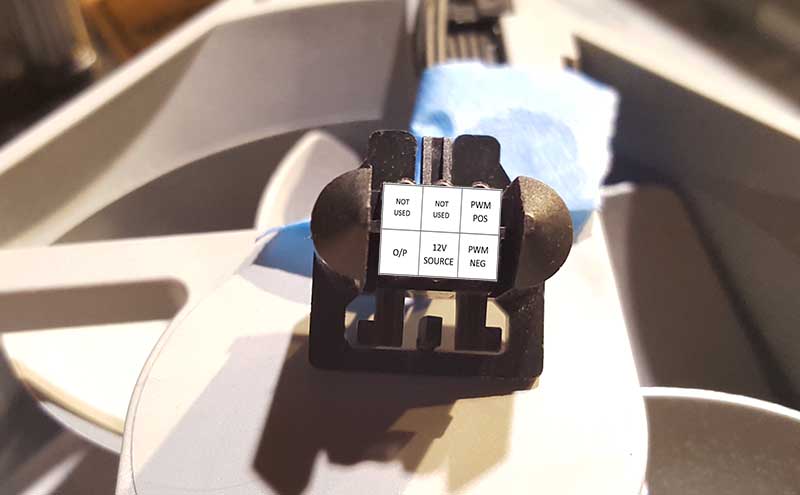
The Delta fans Mac used in the Mac Pro use the same pins essentially. Ground is ground, VCC is +12V, O/P is Sense/Tacho, and VM or PWM is PWM. If you remote the grey sticker on the back of the fan, you’ll see the same four wires on most of these fans no matter the connector.
VM/PWM, VCC/+, O/P, and GND/- are shown on both fans.
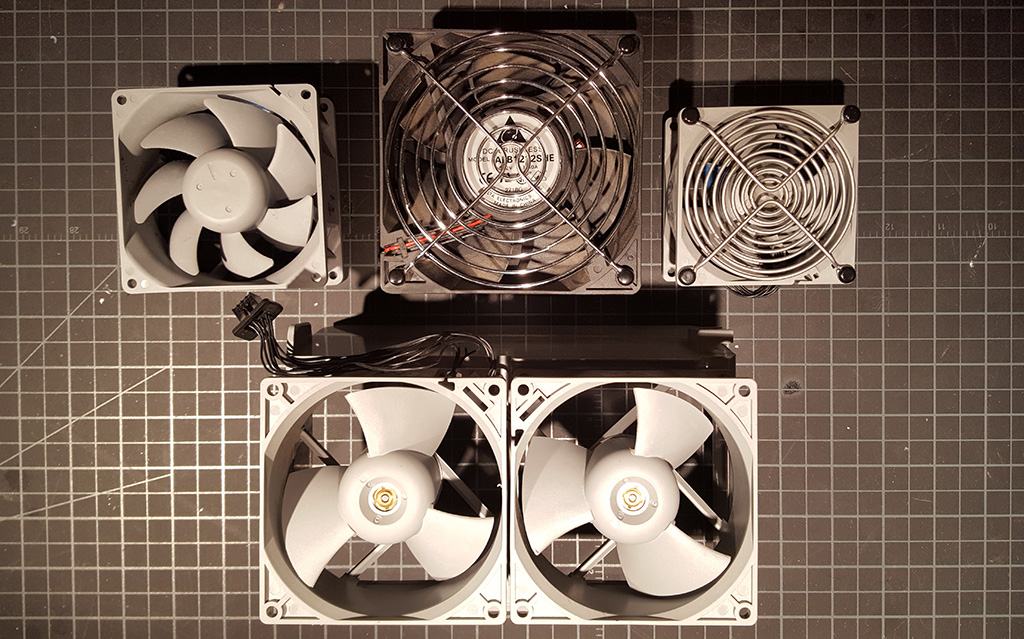
Mac Connectors
These connectors are from Power Macs and Mac Pros. I’ll add more if I find more; let me know if you need a specific fan figured out and I’ll add it.
This fan was out of a Power Mac (G4?), and I’ve seen this connector and pinout on others.
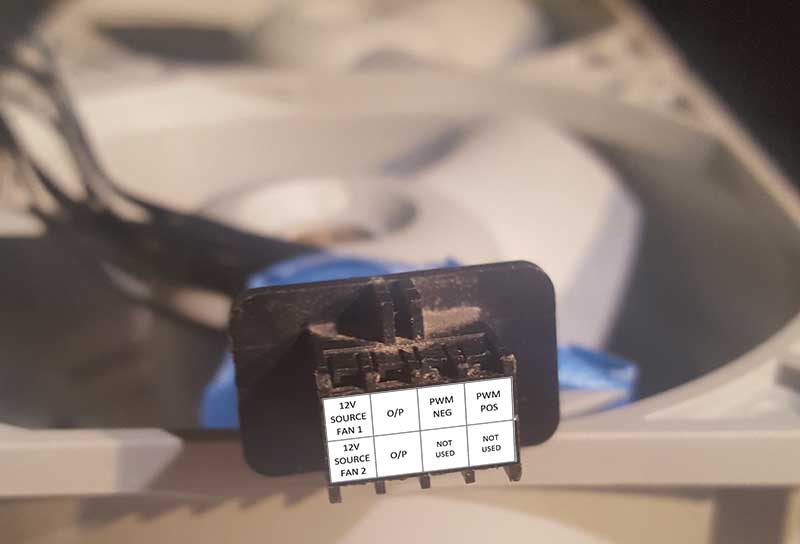
This fan was out of a Mac Pro, 2009-2010. This is the PCI Fan (blows on GPU, center of tower.)
These dual 3 blade fans are at the intake of the Power Mac G5 CPU(s).
PWM Wiring
These are PWM fans, which means they need a continuous sequence of pulses timed accordingly to how fast they should be spinning. I’m seeing that some of the Mac fans can simply be fed the same input voltage to this pin and it works fine (the centrifugal fan from a Power Mac G5 worked fine like this), but most of the fans will not function if you simply put a DC voltage on the PWM pin.
There’s a lot of ways to get this done, and whether you’re using a voltage controlled oscillator, astable multivibrator 555 timer, an Arduino/microcontroller, or a fan PWM controller, you’re accomplishing the same thing. For simplicity, I’m going to use one of these eBay PWM controllers I’ve had collecting dust for a while. Search “fan pwm controller” on Amazon/eBay and you’ll find plenty of $2-6 controllers.
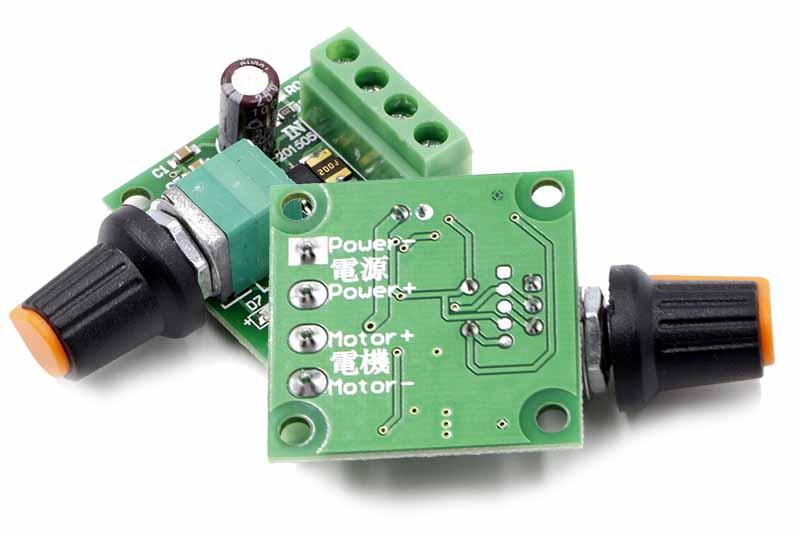
- Input:
- Power +/-, from power source
- Motor +/- go to the fan PWM pin and -/GND
So the fan receives power straight from the source, PWM from the PWM “Motor +”, and GND from the PWM “Motor -“.
We’re not using the O/P/Sense/Tacho pin. This pin is a feedback which tells the computer how fast the fan motor is actually spinning.
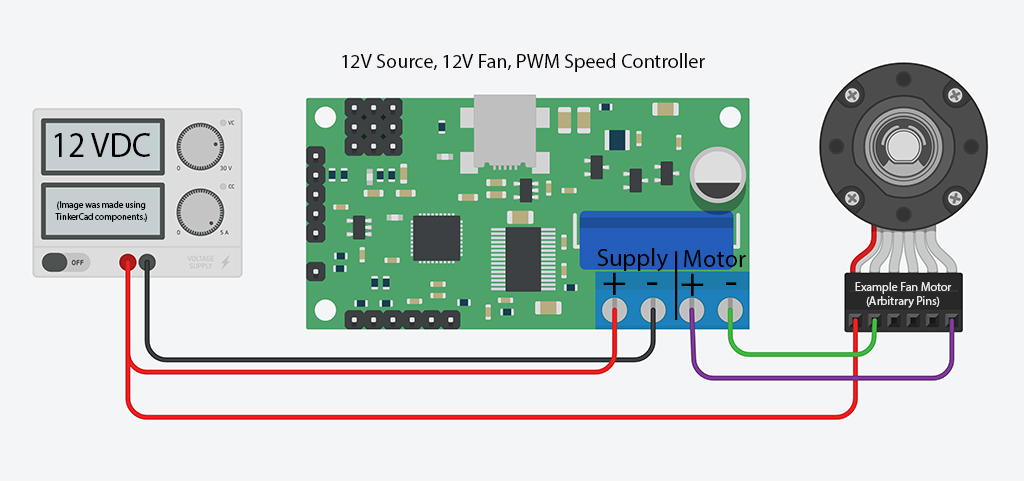
12V Wiring
If you’re using a 12V source, you’ll want to wire it like this:
24V Wiring
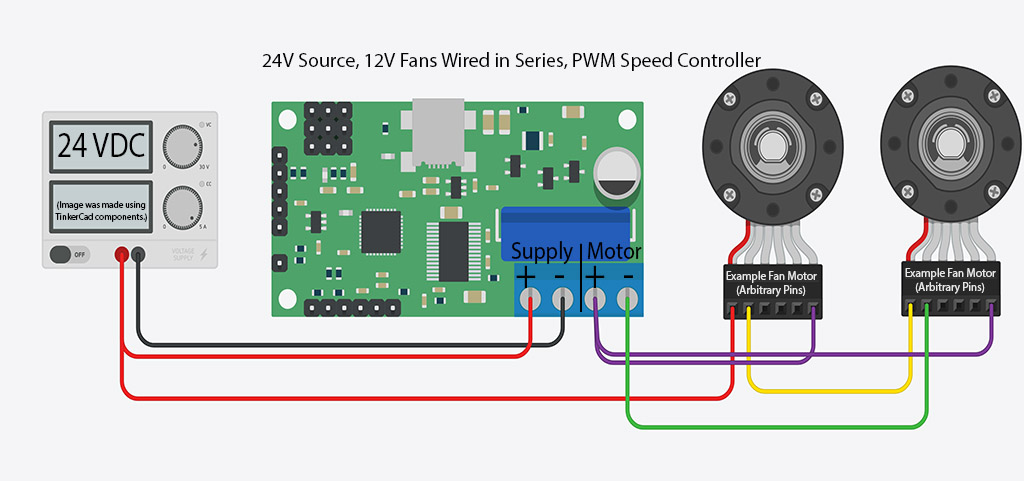
Dual Fans
If you’re using a 24V source, and are using 2 fans, you can wire the two fans in series and they will run at 12V each. When wiring in series, the source voltage is split between the two loads. Wire it like this:
Single Fan
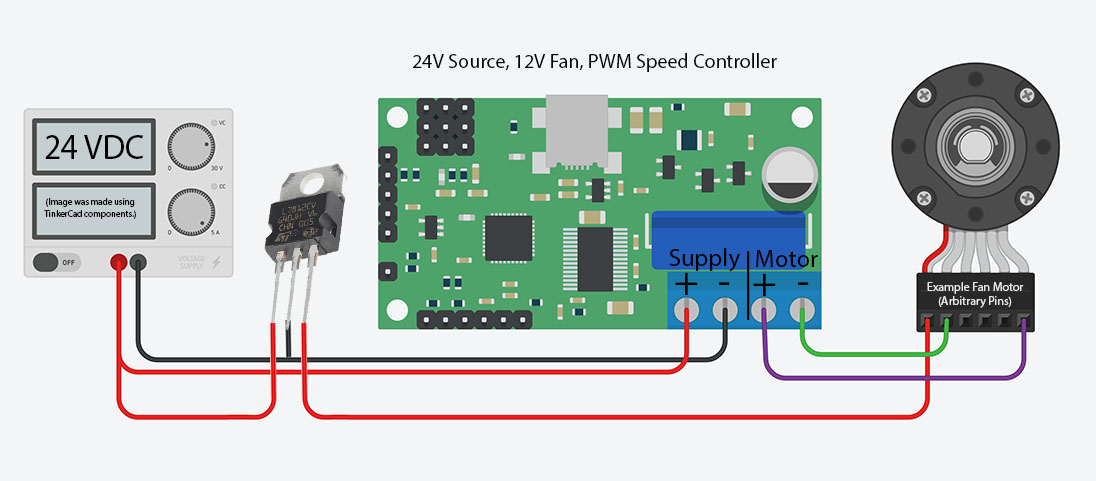
If you’re using a 24V source, and one 12V fan, you’ll need additional circuitry to bring the 24V source down to 12-10V. I’m going on about 12V sources because my 3D printer is 24V, as are many of them. On the blower fan I recycled from a Power Mac G5 (which didn’t need a PWM controller) I used an LM317T Adjustable-Voltage Regulator. This also needed a 200 ohm resistor and a 2k potentiometer to control the output voltage from the regulator. I used the output voltage to control the speed of the fan.
Since in this case we’re using a PWM controller to control the speed of the fan, I’d recommend something like an LM7812 voltage regulator since it would not require additional components (though I’d really recommend not using a linear but rather a switching regulator, preferably a nice one like from Pololu) Wire it like so:
You may want to use a heat sink on this component and/or place it inline with whatever the fan is blowing on for active cooling. They’re good for 1 amp per the spec sheet but what’s often overlooked is that assumes some type of cooling as you can observe in the response curves. The more current you pull from them the more you’ll want a good sized heat sink. Check the amperage on whatever fan you’re using to make sure you’re good. If it’s rated above ~0.8A I’d use a different voltage regulator.
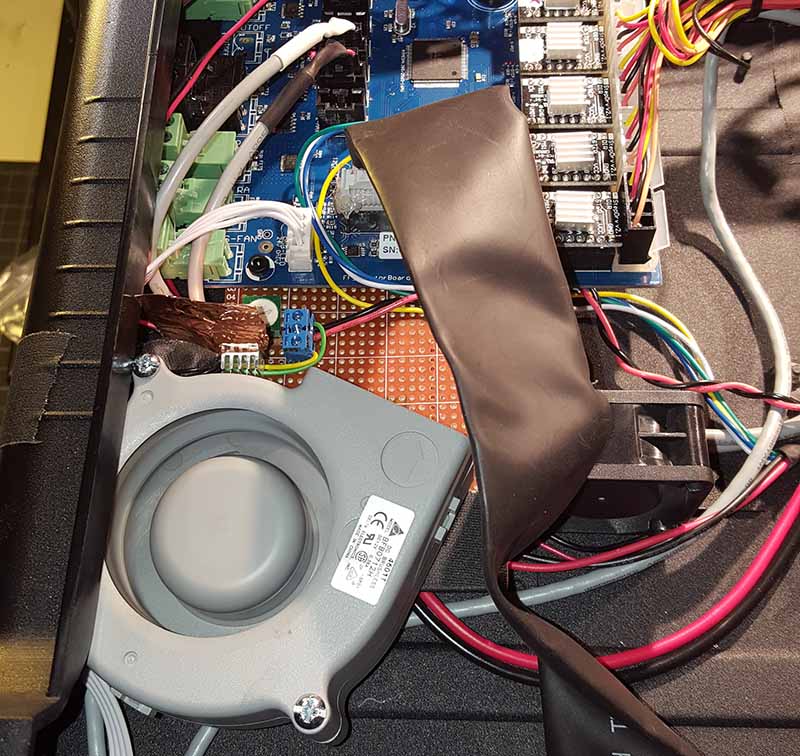
Note the LM317T, voltage control potentiometer/resistor (R1/R2) and a wiring connector soldered to the perfboard the blower also rests on.
This fan provides supplementary cooling to the driver chips, as well as general air circulation in the enclosed space at the bottom of my printer which houses the control board and power supply. One of the driver chips went out after a long continuous operation. I was thankfully able to swap it with one of the extruder driver chips and everything works fine now. The grey Delta blower from a Power Mac G5 supplements the dinky 40x40 fan next to it which does next to nothing.
Conclusion
So if you’re reusing these fans for other uses, reusing them in your hackintosh on a PC motherboard, or elsewhere I hope I’ve provided a little more practical application basic breakdown here. This writeup is not meant to be exhaustive, but I’ll do additional digging or add more per your request. Just let me know.